If your PC is an “old scrap” like the Millennium Falcon, try to find the best settings for Star Wars: Jedi Survivor
By now you know us: you have found on this site the best settings for the PC version of Dead Island 2, so it was only a matter of time before we did the same with Eat Survivorlast arrived at home Star Wars. Well, that’s why we’re here. We haven’t linked our other guide by chance: keep it open in another tab (it can also be done on smartphones) to make the necessary comparisons. Of course, it must also be said that each project (and each development team) has different needs, and with an IP of the caliber of Star Wars there will be a bit more to play with video quality, anti-aliasing and even ray tracing. At work!
Tools of the Trade – Star Wars: Jedi Survivor, best settings on PC
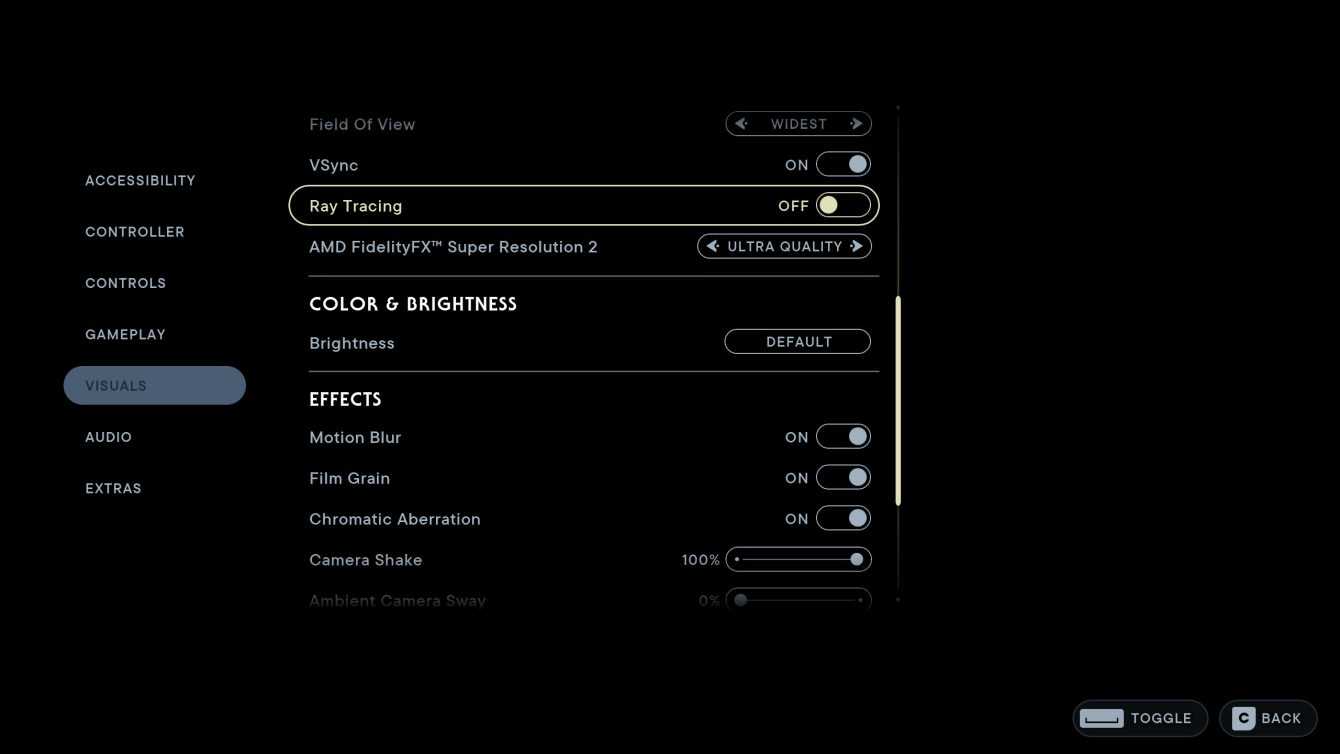
The graphics settings of Star Wars: Jedi Survivor on PC are not many, but it is good that you know the menu before selecting the best ones. Here’s what awaits you on the decisive screen:
- Window Mode: Full Screen, Windowed Full Screen, Window
- Graphics Quality: Low, Medium, High, Epic
- View Distance: Low, Medium, High, Epic
- Shadow Quality: Low, Medium, High, Epic
- Anti-Aliasing: Low, Medium, High, Epic
- Texture Quality: Low, Medium, High, Epic
- Visual Effects: Lows, Mids, Highs, Epics
- Post Processing: Low, Medium, High, Epic
- Foliage Detail: Low, Medium, High, Epic
- Field of View: Nearest, Near, Default, Wide, Widest
- VSync: Off, On
- Ray Tracing: Off, On
- AMD Fidelity FX Super Resolution 2: Disabled/Ultra Quality
- Brightness: Index to place
- Motion Blur: Off, On
- Film Grain (Projector Filter): Off, On
- Chromatic Aberration: Off, On
- Camera Shake: Index to place
- Ambient Camera Sway: Index to place
- Hide HUD: Off, On

Ideal performance requirements – Star Wars: Jedi Survivor, best settings on PC
Of course, without a mortgage you can hardly set everything to maximum and still have the best experience. Mouse and keyboard purists will be annoyed to hear this, but playing on consoles the long process of optimization is eliminated. However, this will not prevent us from getting you out of the quagmire, which could get stickier in the event of a post-launch patch as happened with Fallen Order. In fact of performance some problems have been encountered on the PC front, so we would suggest you to try these settings. Click the “options” item from the main menu, or head to the gear icon at the top right of the in-game menu. Now look for the graphics entry.
For the resolutionchoose the native one of the monitor and set everything to full screen. Set everything to “Low” up to the Post-processing item (included). You can do this with foliage details as well, but you may run the risk of not seeing some plants that you can interact with. Choose “Performance” for the AMD graphics card and, finally, set all the items that allow it to “Off” and set the various indicators to a minimum. This way, you should make sure that the game works. We’ll give you some time to try, don’t worry.

Other Tunings – Star Wars: Jedi Survivor, better settings on PC
Speaking of AMD, what can we say about it? The option AMD FidelityFX Super Resolution 2 (“and Knuckles”) is all about upscaling and, as such, can dramatically improve performance (literally). Works with Nvidia GPUs from 10-series video cards onwards. By default, this item is disabled; activate it and, setting it on Performance you should get more frames per second at the cost of a reduction in image quality. Despite the swap, it’s possible to set everything to Ultra quality and still enjoy a nice boost in framerates. You see.
Of course, it’s also possible that a low framerate is a result of other settings outside the game… in other words, of settings related to your computer itself. In this case, what has been said up to now leaves some time for it. If the options we have listed above do not prove to be decisive, you should dedicate yourself to the PC itself before returning to the game. Keep yours updated driver for GPUs, especially in this first period after launch. Driver updates often come out alongside titles of this caliber, which is why you should pay for it consult the official sites of AMD and Nvidia.

Pimp My Computer – Star Wars: Jedi Survivor, best settings on PC
There is also the question of overlay to be defined. If there are especially four of them running in the background, make sure you disable them. It is, specifically, the overlay of Steamof that of EAof that of Radeon and even that of Nvidia GeForce Experience. More generally, moreover, it is definitely worth it avoid that there are other applications open silently while you play. Unless it’s something you’re actually using, these programs consume resources that inevitably affect the performance of the title. Try closing them, and you should see improvements right away.
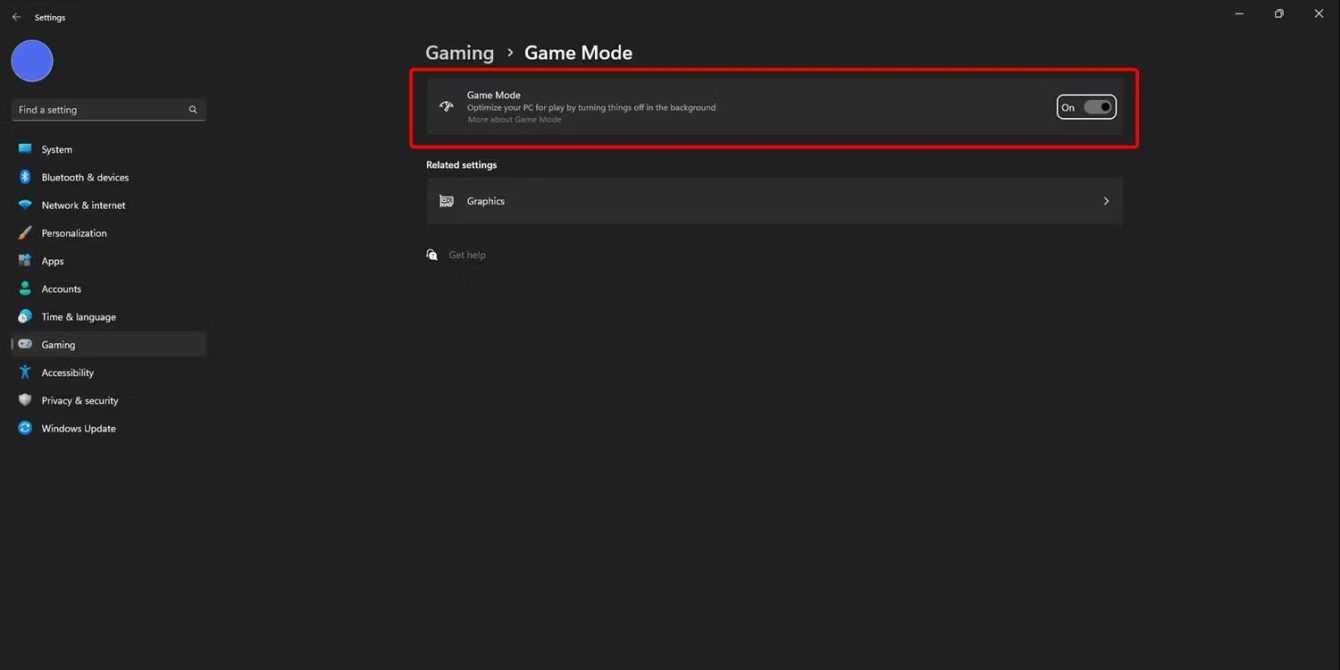
Open the task manager (o activity management if you are more accustomed to the Italian name) by pressing Ctrl, Shift and Esc together. Click on the Processes tab and sort them by CPU or Memory. Right-click all the apps running in the background that you don’t need, and choose the appropriate option to kill the processes. Most modern PCs also benefit from an optimization mode for gaming in the settings. Click on the appropriate option (“Game mode” if your PC is set to English) and enable it. We believe we have told you everything.

“So what?”
If none of this works, you may just have to wait for a update of the game expressly aimed at optimization. As we said before, the support in these early days will probably be great, and therefore most gamers should be able to benefit from the new game features. Your range of options is vast, but if the room for maneuver is not enough for any reason, you can always wait for the developers to provide their solution. In the meantime, we hope we’ve been of some help to you!
Do you think we were able to? Let us know below, and as always, don’t forget to stay on tuttotek for all the most important news for gamers and more. For your purely gaming needs, you can instead find the best discounts in digital format on Kinguin.


Leave a Reply
View Comments