

Do you want to quickly transfer files between your PC and your iPhone, but you don’t want to use neither the Lightning cable nor external apps? Don’t worry, there’s a quick and easy way to do it, using the properties of shared folders of Windows 10 and 11. You just need to assign a static IP to your PC and then create a shared folder that you can access from your iPhone via a native app. This way, once the first connection is established, you can drag PC files into a folder to find them on your iPhone, and vice versa. Just be connected to the same WiFi network. In this guide we will explain to you step by step how to do it.
How to transfer files between PC and iPhone, without cables or external apps
The possibilities for passing files of all kinds (images, videos, projects) between iPhone and PC are different. Indeed, you simply can Connect your iPhone to PC with Lightning cable. Or you can use one of the many applications that use the cloud to act as an online bridge between your phone and computer. Come on services like WeTransfer up to messaging apps like Telegramor the dear and reliable email.
But if there was a way to transfer files between PC and iPhone, without cables or third-party apps? There is a solution and the only real prerequisite is to stay connected to the same network (with WiFi for the smartphone, WiFi or Ethernet cable for the PC).
We show you how to do it in a simple way.
NordVPN – 56% off annual plan + 3 months free. Best VPN service in Italy.
Transfer files between PC and iPhone – give the right folder permissions
The first step to quickly share files between PCs and smartphones is to give folders the right permissions. Indeed, to a single folder: in this way you will have only one place to transfer files to iPhone. So:
- Create a folder and give it a name (for convenience, you can create it on the desktop and call it iPhone, but you can do as you wish)
- Click on the folder with the right mouse button
- Click on the tab Sharing up
- Select Advanced Sharing
- Tick Share folder above
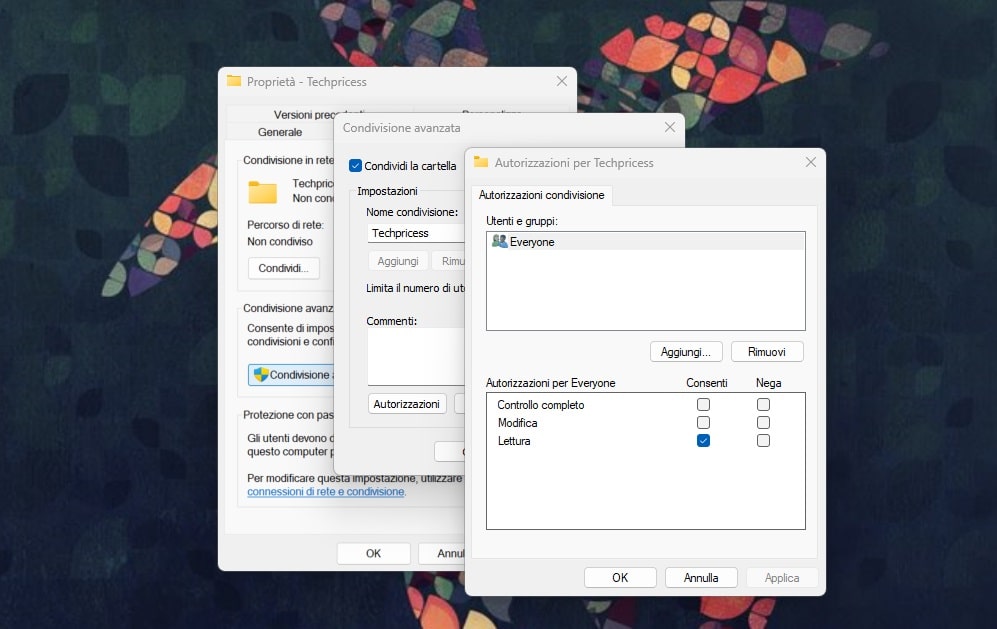
- You can, if you wish, choose a name for the share (by default it is that of the folder)
- Click on Permissions
- Tick it consented on all values (Read, Modify and Full Control)
Your folder is now ready for sharing. But you need to have a static IP. If you don’t know how to do it, we will explain it to you in the next paragraph.
Assign a static IP to your PC
To establish a static IP address on Windows 11, you need to follow these steps:
- Open the Control Panel and click on Network and the Internet.
- Click on network and sharing center and then up Change adapter settings.
- Select the network card you want to configure and click with the right mouse button. Choose Property from the context menu.
- In the properties window, select Internet Protocol Version 4 (TCP/IPv4) and click on Property.
- In the TCP/IPv4 properties window, select Use the following IP address and enter the desired values for the IP address. Something like 192.168.1.X, where X is a number from 2 to 253
- Click on OK to save the changes and close the open windows.
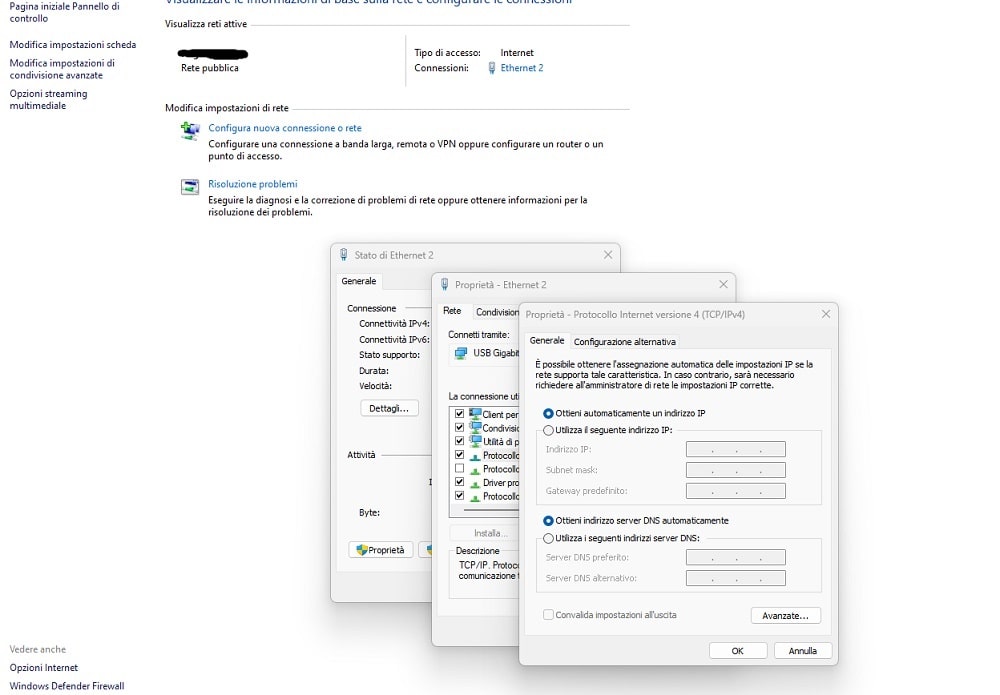
This operation is convenient only on secure networks such as the home one, if well protected by a password. With public or corporate WiFi it may not work or be dangerousso avoid doing this: the folder will update when you connect to your home network.
Connect your iPhone
Once everything is fixed on the PC, you can switch to the iPhone:
- Open the app File
- Click on three dots of the Settings above
- Select Connect to server
- Enter the I hereP static of the folder
- Enter your Microsoft account username and password, the ones you use to log into Windows
All done
Once you follow these steps, the folder on your PC becomes a kind of bridge between iPhone and computer. You can exchange files in both directions with ease. If you copy or drag a video or file (even a large one) into the folder, you will be able to find it on iPhone in no time: you’ll use all the WiFi bandwidth, it will be fast when sharing on Mac. And vice versa: if you need to edit photos or videos, this could be the best solution.
We hope this simple trick will help you. If you need further explanations, ask them in the comments. We report this Reel on Facebook which explains the steps very well (except the assignment of the IP address).