
The impact of noise and its handling when raising the ISO sensitivity of the camera body are one of the most discussed and dominant aspects of digital photography. How to handle high ISOs?
In this article I dissect the problem, I present some tips to manage the noise both in the shooting phase and in post production; finally, I present a more holistic approach to the problem.
How to handle high ISOs? – The issue of noise
Noise in digital photos, its impact and its management are one of the most debated topics in digital photography. The noise I intend to talk about is the one that plagues the images when you go to raise the ISO sensitivity of the sensor. I find this term a bit fallacious: the sensitivity of the sensor is always the same, when you go to increase the ISO, it simply increases the amplification of the electrical signal that comes out of the sensor when it is excited by the light that hits it. This fact only amplifies the sensor noise in a more perceptible way and obviously also introduces some noise intrinsically due to the amplification. The sum of these two factors results in a much reviled loss of detail in the shots and on the rise of the so-called notorious “grain” of the shot (a term borrowed from analogue photography but which has a very different meaning and origin).

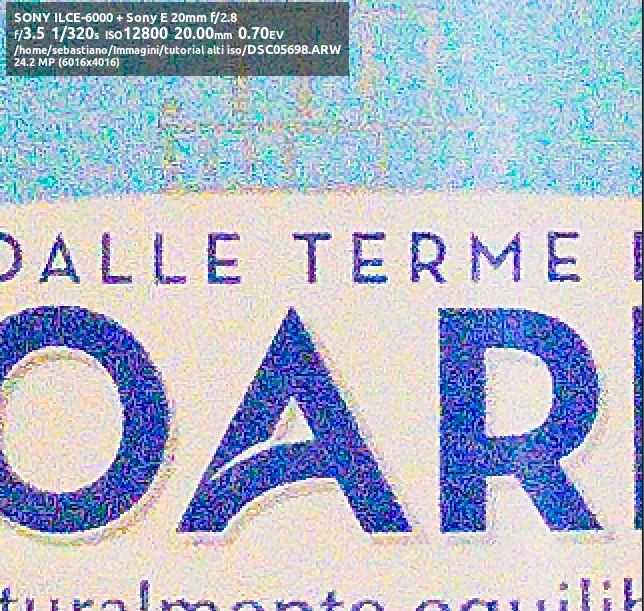
Example image of the effect of using high ISO in image detail (100% view)
There are photographers who see this effect as smoke in the eyes, others who are commonly called “good mouth” and who accept it more willingly. Here I already feel like making the first distinction. In photography a lot can be measured (eg aperture times, ISO) and little is measured, with the result that measurable quantities are always described with qualitative adjectives such as “high” and “low” without placing them in a more quantitative context. Just to lead the discussion I will define as high the ISO sensitivities over 3200 ISO, that remembering the progression of the stops in base 2, correspond to 5 stops of difference compared to the usual ISO 100 which is the basis of modern digital sensors.
How to handle high ISOs? – Manage the noise during shooting
However, it is already time for a second distinction: if photography were only the mechanical repetition of certain parameters in certain places or with certain subjects it would be very simple to perform and perhaps even very boring. The control and the plus comes from the photographer who tries to communicate something to us with his shot. For this we need a more “philosophical” digression. The acceptance of noise in a shot is purely personal. My personal philosophy about it is that a shot with the noise of no shutter is always better. Finally, the impact it has on the result depends on the single shot, so it is very difficult to create a vademecum, but it is certainly possible to give some general rules to manage the noise.
- When you find yourself having to raise the ISO beyond the value you consider the limit in order not to bother you in a shot, expose for the shadows in your composition. In this way you will have to recover the lights of your shot in post production, but the noise will remain “drowned in the lights” and will be less noticeable. If, on the other hand, you would expose for the lights you might find yourself managing the shadows of the shot in post production. In this case the noise grain would remain much more visible. In the images below the noise effect is not dissimilar, but in the image on the right I have exposed the scene for the shadows, at 12800 ISO, while in the one on the left I have exposed for the lights and raised the shadows .. and there are more 2 stops of difference to reach ISO 2500 ..

Noise at ISO 2500 in a shaded area by exposing for the highlights and recovering the shadows to have them correctly exposed.

Right: noise at ISO 12800 in a shaded area when exposing for itself
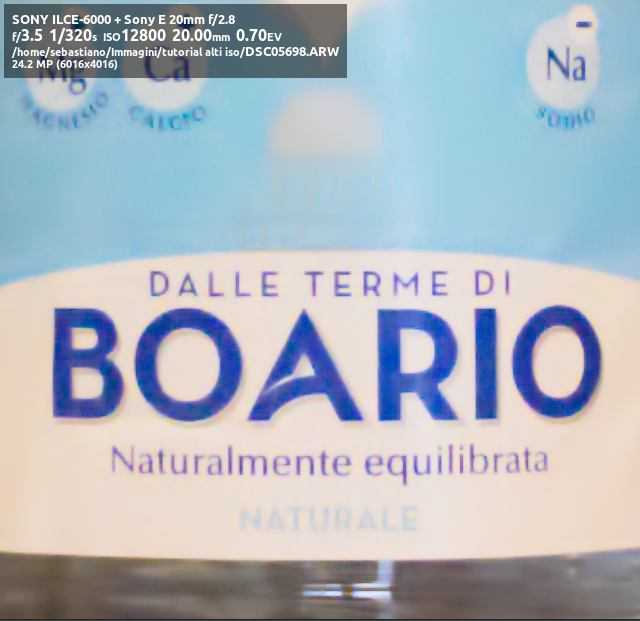
- The same would happen if you were to raise the exposure of your shot. For this another good tip is to adjust the exposure of the car, overexposing by 0.3-0.7 stops. If the shot were eventually overexposed the noise would still be drowned in the lights (see the previous point). The image below, compared with the previous one at the beginning of the article, is a good example of the impact of this technique.

Effect of overexposure on the impact of noise
- The worst and most underrated aspect for me of raising the ISO is that it goes hand in hand reduce the dynamic range of the shot. While some post-production tricks can be invented due to the terrible grain, this is a physical limit of the sensor and little can be done about it. If you find a sensitivity beyond which the reduction of dynamic range is too severe for your taste and your body options allow it, I recommend that you configure the ISO AUTO function at this threshold. In practice, this is an active function when using manual or semi-manual exposure (M, A, S) which selects limits for ISO sensitivity. The camera will manage the exposure according to your wishes in terms of time and aperture and according to the exposure metering will adjust the ISO between the limits you set.
How to handle high ISOs? – Manage noise in post production
These tips are useful for checking the effects of raising the ISO when shooting. Below instead I discuss some tips to reduce their impact on a shot already made in post production. I do my (little) post production with Rawtherapee, a multi-platform open source software that I feel I can recommend, but what is presented below is easily obtainable with any post production software.
- The impact of the “grain” on the result also depends on the demosacification crop. This is the alogorithm that maps the different colors into a single pixel in Bayer’s sensors. There are more or less performing algorithms in the yield of the grain. I recommend that you study the related section of your post production program manual.
- In general the effect of the noise is emphasized by all the operations that are aimed at increasing the contrast and sharpness of the shot, so always check the result when applying unsharp masks and the like.
The use of tools that increase contrast and sharpness (unsharp mask in this case) on an image at high ISO end up also amplifying the disturbances due to noise
- Each program has its own noise reduction “engine”. Although we often read that these algorithms carry long-forgotten plagues and are therefore to be avoided, in reality there is nothing wrong with using them. The downside is these algorithms have as an inborn side effect of reduce detail shots, so you must always make sure you have not exaggerated ..
Effect of applying a noise reduction algorithm in post production
How to handle high ISOs? – A more holistic approach to noise
However, I would like to shift the discussion to a slightly more poetic level. To do this correctly I must first pose a problem that at least deserves an article in itself: what is the destination of your shots? The impact that noise has on your shots depends heavily on what you intend to do with your shots, for example if you share them on social media rather than gazing at them on screen at 100% or printing them. In general, printing is a process that mitigates the problem but it depends a lot on the format being printed. Here too I would like to give some indications:
- For the publication on social networks the problem of noise is marginal. Very often platforms and devices impose a compression of the photos that would make any attempt to try to discern the noise in the shot in vain
- If you always gaze at your PC shots at high magnification (or rather at dimensions close to 100%) you will see all the detail of the noise, but honestly you will not appreciate the full breadth of the shot, so who cares? And don’t think that with a better body, things will change ..
- If you usually print your shots, the print format makes the difference on the role of noise. For sure for the classic memory formats 10 × 15, 12 × 19, the resolution of modern sensors is such as to make the grain effect negligible. As for the reduction of dynamic range of course it is different. For larger formats, the advice is to print a shot that seems representative of the noise without any post production and noise reduction in particular and evaluate the impact on the print. The question is actually even more complicated because one thing is looking at a shot on an album 10 cm from the page and another is admiring a print hanging on a wall 2 meters away.
- If you notice that you often run into the problem of high ISOs in a given context, perhaps this is the case with increase the brightness of the lens you are using, perhaps buying a specific fixed lens for the purpose
Since I’m not spending time looking at the details at 100% of their shots, I have personally decided to ignore the noise in the shots. My camera body is declared up to ISO 25600 and I use them all. 90% of the high ISO shots I take are indoors, in the evening, perhaps in winter, for my children. However, I do not intend to use the flash when I immortalize them often the only way to get the shot is to go up with the ISO. But since I’m looking for the expressions and not the purity of the result, I’m happy to give them up just to get the shot.
As you can see, this article ends exactly with the concept with which it was started: it is a personal matter. So, click and try, only then will you be able to find your way and your balance.