

How to Record Your Windows PC or Mac Screen? Let’s find out together in this detailed guide how to do it easily!
In this guide we will show you how to record the screen of your Windows PC or Mac in a few simple steps.
Whether you are a gamer who wants to record his gameplay, a content creator who wants to record the screen for the creation of a video tutorial or a simple user who wants to show the functioning of an app to another person, this is the guide. just to understand how to do it.
How to natively record screen on Windows 10
Windows 10 offers the possibility to record the screen natively, even if the tool is designed to record the gameplay of games, but its functionality can be extended to any program.
- press the button at the same time Windows (⊞) + G
- check the item “Yes, this is a game”
- Click on red button Start Recording or use the key combination Windows (⊞) + Alt + R
- to stop recording you just need click on the red registration bar at the top right of the screen
How to natively record the Mac screen
Depending on the version of macOS installed on your Mac, you can natively record your screen, without the need for third-party apps like OBS.
If it is installed on your Mac macOS Mojave (10.14.6) or higher all you need to do to record the screen is to press simultaneously Shift-Command (⌘)-5 on your keyboard.
Then a small dock will appear (see image) where you can capture the screen as an image (A, B, C) or as a video (D, E):
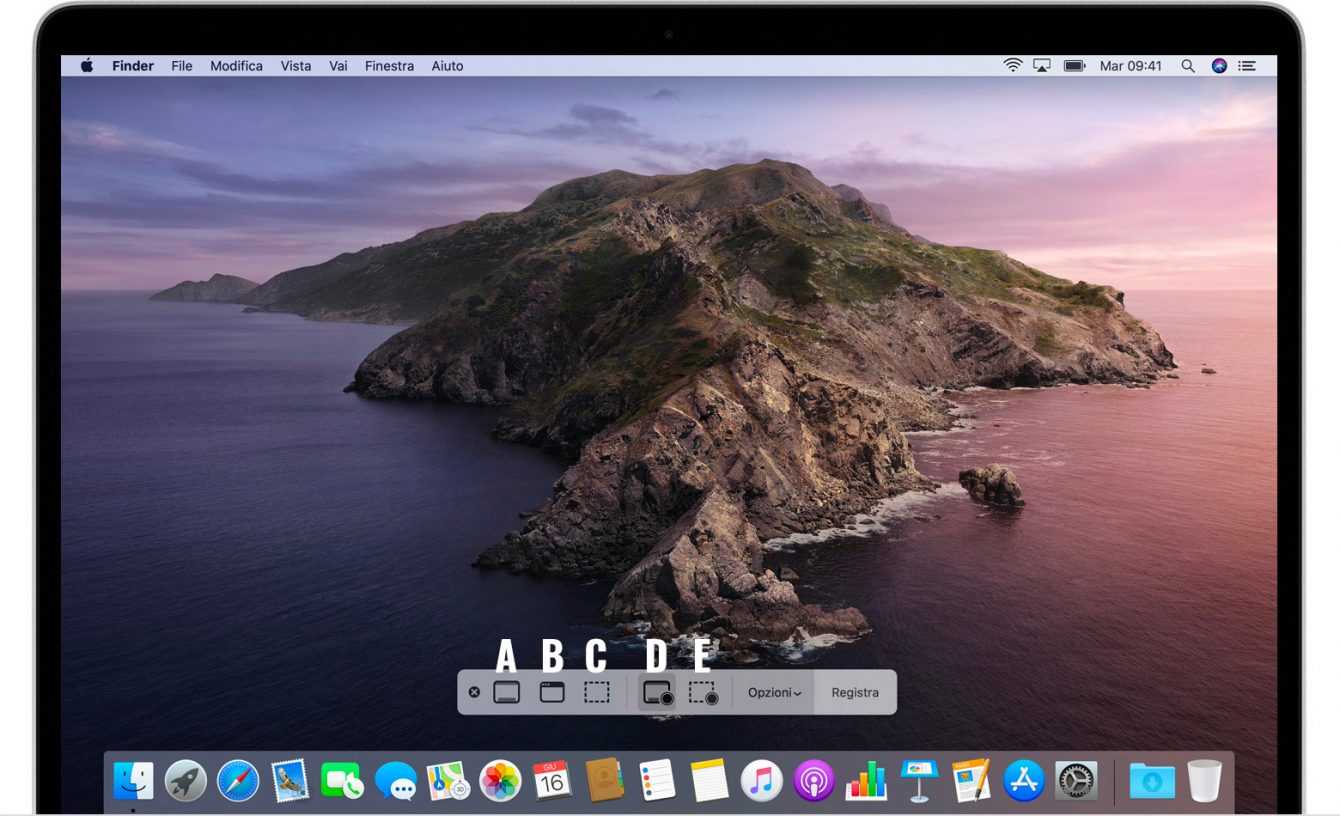
- select the recording mode (D The E)
- select where to save the file from the menu Options
- record (Acquire) to start recording
- to end the registration you will have to press the button in the top bar
- when recording is finished, the video file will appear on your desktop or in the folder you previously selected from the menu Options
If you prefer more customizable software you can use OBS by following the instructions on how to set it up for Windows 10.
How to Record PC Screen on Windows 10, 8.1, macOS and Linux with OBS
The best way to record screen on Windows 10, 8.1, 8, macOS and Linux is to use OBS, a free and open source software, more complete and configurable than the native programs mentioned above.
To start using OBS follow the steps below:
Windows
- download the installer
- once the download is complete open the file OBS-Studio-25.0.8-Full-Installer-x64.exe and follow the steps to complete the installation
Mac
- download the installer
- once the download is complete open the file obs-mac-25.0.8.dmg it’s simply drag the OBS icon into the Applications folder
These steps are the same regardless of the operating system used:
- open OBS
- Click on + in the box Sources down
- select Capture the screen
- leave the check mark on Create a new source and if you want change the default name (Capture screen)
- click on Ok
- if OBS only shows part of the screen, go for it right click -> Transform -> Fit to Screen
- now just click on Start recording to start recording your screen
- to finish select Finish the registration
- to view the folder containing the recordings click on File -> View Recordings
Troubleshooting
If you’re only registering black screen using OBS, try one of these solutions:
Windows
- click on an empty spot on the desktop with the right mouse button e select Display Settings -> Graphics Settings (last item at the end of the page)
- from the drop-down menu under the heading Choose an app to set your preference, select Classic app and then click on Browse
- at this point you have to look for the OBS .exe file, generally you should find it in C:Program Filesobs-studiobin64bitobs64.exe
- the icon should now appear under the Browse button OBS Studio, click on it and press the Options button -> select Energy Saver -> Save
If after completing this procedure OBS continues to record a black screen and your PC is equipped with an Nvidia graphics card, do the following:
- click with right click anywhere on the desktop
- click on Nvidia control panel
- from the left side menu click on 3D Settings -> Manage 3D Settings
- to the item Program Settings, from the drop-down menu under the point 1. Select a program to customize, select OBS Studio
- from the drop-down menu under the point 2. Select your preferred graphics processor for this program, choose High performance Nvidia processor
- click Apply e close the Nvidia Control Panel
Mac
- you open System Preferences -> Security and Privacy -> Screen Recording
- put the check next to OBS
- close and reopen OBS.