
In this guide we will address a topic that is often a source of doubts and perplexities for those who are still beginners with photography: how to photograph the stars
Being a very large topic, we will divide this discussion into several parts. We will focus on astronomical photography wide field. In this second part (here the first) we will talk about the best settings to use on your camera for this type of shots.
Which aperture?
Much depends on the lens we are using. The main problem is the “coma”: it will tend to deform the stars making them non-point.
Another annoying defect is “spherical aberration”: it tends to transform circular light sources into ellipses.
And finally “chromatic aberration”: it tends to form a halo around the stars.
It is in our interest to avoid the occurrence of such defects already in the shooting phase. There are two ways to do this: close the diaphragm or use a very correct lens.
The objectives listed in the first part are very correct from this point of view and do not need to be “closed”. They can all be used safely at f / 2.8.
Using lenses that do not correct these defects well we should close the aperture by about 1 / 2-1 Stop, the 18-55 would be good to close it to f / 4 or f / 4.5.
Which ISO?
The choice of ISO is usually less of a problem. You always work at ISO 1600 or ISO 3200. Values that may seem excessively high, but which in this type of photography are more than acceptable.
We have to make the choice based on the light conditions we find on site: we will choose ISO 1600 if there are many stray lights, we will prefer ISO 3200 if there are none.
Furthermore, if the place allows it because it is very dark we could also think of using even higher ISOs.
How do I choose the timing?
There are a lot of rules to choose the shutter speed, all designed to prevent the stars from being moved. At the time of film the rule of 600 was used, but with the advent of increasingly dense sensors this rule can no longer be used. Personally, I am happy with the 450 rule.
The shutter speed will be given by 450 divided by the “equivalent focal”. Doing the math the following table is valid (times in seconds):
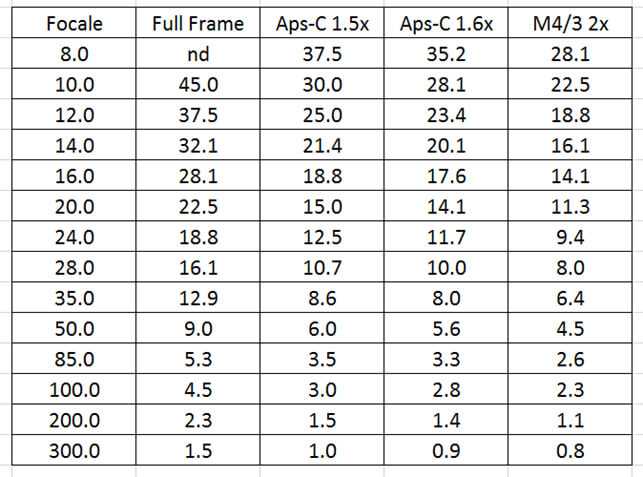
At these times we can make corrections in the negative but not in the positive. That is, it is okay to choose shorter times but it is better to avoid longer times.
The times must be shortened by about 1/3 compared to the data calculated with this rule if we frame an area of the sky close to the polar star. As you can see, the wider focal lengths allow longer times. These times allow the camera to “pick up” more light, and then provide a correctly exposed photo using ISO 1600 or 3200 as reported above.
Turn off noise reduction for long exposures
It will be good to disable this setting and provide “otherwise” to reduce the noise generated by the camera. This is because otherwise the shooting times are lengthened and the sensor will irretrievably tend to heat up and produce more and more noise. For this reason it is good to take “dark frames”, that is to take pictures with the same ISO and times with the cap mounted in front of the lens.
We will see in the next part what to do with our dark frames. In general, it is always better to take more than one, 10 could be the ideal number but it depends on how many photos we take.
Beyond the technique: tips for a more enjoyable skyrocketing photography
The above applies to obtaining a single exposure as correct as possible.
But maybe we are interested in doing a “startrails” (trail of stars). In this case you need to take at least 100 photos with the same shot. Pointing the car towards the polar helps to accentuate the movement of the stars in the startrails. Be careful to include parts of the landscape in the photograph, otherwise your photo will be “sterile”. In this sense, help yourself with the rule of thirds, or by using diagonals, foreground subjects, etc. to “set the photo” and make the observer participate in the scene.
Photographing the stars: how, when and what it takes – Part 2
That’s all for now. In the third part we will see how to process the photographs taken.