

Let’s find out how to change DNS on Windows 10 in a simple and free way and what are the advantages of these servers!
Very often it happens to hear about DNS servers and what advantages can be obtained by changing them on your PC, but it is not always possible to fully understand the real IT meaning behind them. If you too have some doubts about it and want to know better what everything we are talking about actually means, you have come to the right place at the right time! So let’s see what it is and how to change DNS servers on Windows 10 quickly, easily and safely!
Attention: TuttooteK and the author of this article do not assume any responsibility for the use of the sites present in this guide, which is for informational purposes only. We emphasize that downloading copyrighted content is illegal: piracy is a crime.
How to change DNS on Windows 10
Before you understand how to change DNS on Windows 10, it is necessary to have a complete picture of what we are talking about: i DNS they are in fact real servers, which perform the function of intermediaries, as they connect the user, such as you who are reading, and the website you are trying to reach and visit. These servers somehow manage to decipher the name of the site that is entered in the search bar of the browser, such as “google.it”, and connect to the corresponding IP address, all in a very short time. The big advantage of DNS servers is therefore to ensure that any user can simply write the name of the desired site instead of the very long series of numbers, corresponding to the real reference coordinates of the website!
Having said that, let’s now analyze in detail how to change DNS on Windows 10 and what are the proceedings currently available.
How to change DNS: the best servers
Among the best DNS servers we certainly have those of Google, but we must not underestimate those of Cloudflare and of OpenDNS. In particular, those of Google are the following:
- Server DNS principale: 8.8.8.8;
- Server DNS alternativo: 8.8.4.4.
Those of Cloudflare they are instead:
- Server DNS principale: 1.1.1.1;
- Server DNS alternativo: 1.0.0.1.
Regarding the DNS offered by OpenDNS, are available:
- Server DNS principale: 208.67.222.222;
- Server DNS alternativo: 208.67.220.220.
Advice: to help you choose the right DNS server, it must be emphasized that those of Google and Cloudflare are useful for visiting sites not accessible from Italy, as they are international servers. In addition, these are DNS rather fast in response and therefore very useful. As for OpenDNS, however, these DNS offer the advantage of being able to activate the parental control function, in order to avoid mistakenly accessing particular websites, such as those for adults.
Another type of DNS server, as an alternative to the ones listed above, is offered by a completely free software, called Namebench: available for Windows 10, it allows you to identify the best DNS servers according to both the connection you have and your geographical location. To be able to download this really easy to use program, connect to the official page by clicking here. Once this is done, select the item “namebench-x.x.x-Windows.exe”, in order to start the download for installation. Once the file is downloaded, open the file and click on the button “Extract”, located on the new screen, then place the check mark in the box for the command “Include censorship checks”, which is used to eliminate any inappropriate DNS from the search that will be carried out. As a last resort, press on “Start”. Once this search is complete, a web page will open where you can view the optimal DNS server configuration for your connection.
How to change DNS on Windows 10: the procedure
Once you’ve figured out which DNS servers are right for you, it’s time to change them on your operating system. This guide reports two valid alternatives which illustrate how to change DNS on Windows 10: in the first case through the system settings, in the second through the Command Prompt. These two methodologies are equivalent to each other.
To change DNS servers from Windows settings, click on “Start”, then select “Control panel”. In the new screen open “Network and Internet”, then presses on “Network and sharing center” and then click on the type of connection you are using, such as “Ethernet” o “Wi-Fi”. Once this is done, the settings related to your connection will open and here you will need to select “Property”. In the new screen, single click on the entry “Internet Protocol Version 4 (TCP / IPv4)” and presses the button again “Property”, located at the bottom. This will open the small page where you can enter the desired DNS servers.
Attention: for the connection to work correctly, be sure to enter both the address favorite than that alternative.
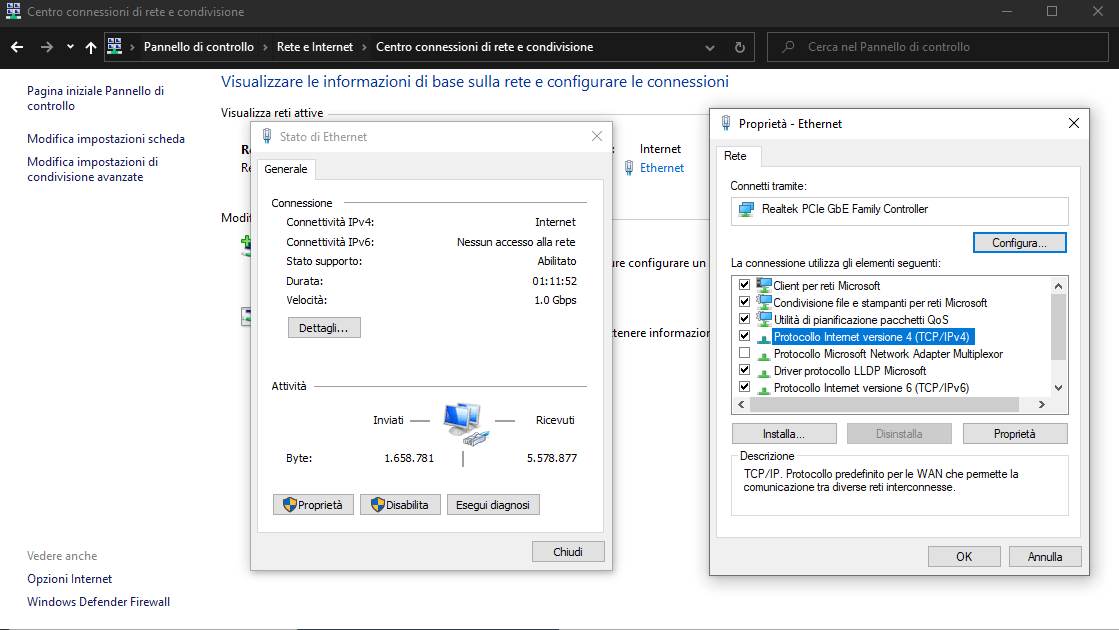
After entering the appropriate addresses, insert the check symbol next to the item “Validate settings on exit”, then confirm.
Advice: if you prefer to acquire DNS servers in automatic mode from your connection, after selecting “Internet Protocol Version 4 (TCP / IPv4)” activate the voice “Obtain DNS Server Address Automatically”.
If you prefer to change DNS servers from Command Prompt, first you have to open the latter, calling it from the appropriate search bar located in the lower left next to “Start”. Remember to run the application as system administrator, then type the command “netsh” and confirm by clicking the button “Enter” on your PC keyboard. At this point, write the command “interface ip set dns “Ethernet” static x.x.x.x primary”, where “xxxx” will be your new DNS address, and confirm again.
To enter the secondary DNS address, instead, type the command “interface ip add dns “Ethernet” x.x.y.y index=2”, where “xxyy” represents the alternate address of your choice, and press “Enter”. By doing so, you have changed your DNS servers for your network connection!
Good fun!
This guide on how to change DNS on Windows 10 easily and for free ends here. Furthermore, We remind you that wandering around websites can be very dangerous, especially if you are not very familiar with the Internet or if you venture to unknown pages, which is why we recommend that you take a look at our guide to best free and paid antivirus.
Stay connected on our pages for other valuable guides on the world of the Web and on the latest news on world of movies, TV series and video games!