

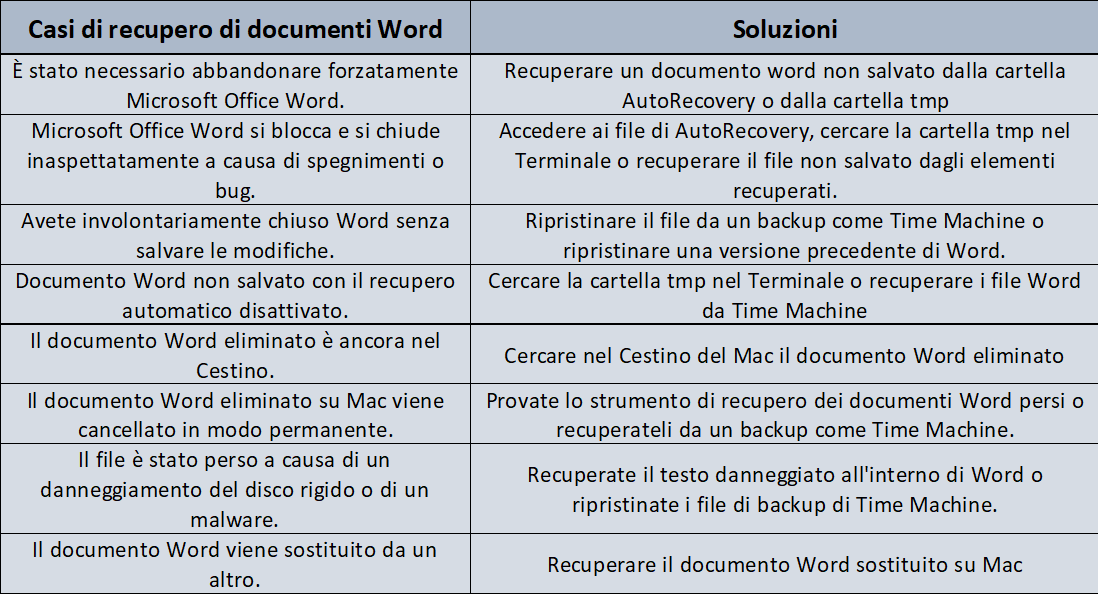
In this article we will look at some ways to recover unsaved Word document on Mac
Although Macs have a built-in word processor for creating documents called Pages, users may find Microsoft Word for Mac more useful, especially for advanced collaboration tools. One of the best features of Microsoft Word is automatic recovery, which greatly reduces the risk of losing important Word files.
If you have not been able to save the changes you made to an important document due to a crash or shutdown of the Word application itself, you will surely be eager to know how to recover an unsaved Word document on Mac.
In addition to unsaved Word documents, you may also want to recover accidentally deleted or lost files in Word. This article discusses various ways to help you recover unsaved, deleted, lost or replaced files when using Microsoft’s Word for Mac. Here are some methods to recover Word document on Mac:
Quick solutions to recover Word documents on Mac
Recover unsaved Word documents on Mac with AutoRecovery
The automatic recovery feature has been present in the Office suite for years and automatically save Word documents open every 10 minutes by default. However, files lost in the last 9 minutes before closing the application cannot be recovered if the default settings are present. It is worth noting that automatic recovery does not replace the Save button, but works in the event of unplanned outages, such as a power outage or when the Word program itself crashes.
Typically, to recover an unsaved Word document on your Mac, simply reopen Microsoft Office Word. A document recovery window will appear which will help you recover the Word file unsaved you were working on before Microsoft Word crashed. If you fail, you can manually find automatically recovered Microsoft Word documents on Mac. Now let’s see in detail how to recover unsaved Word document on Mac with AutoRecovery.
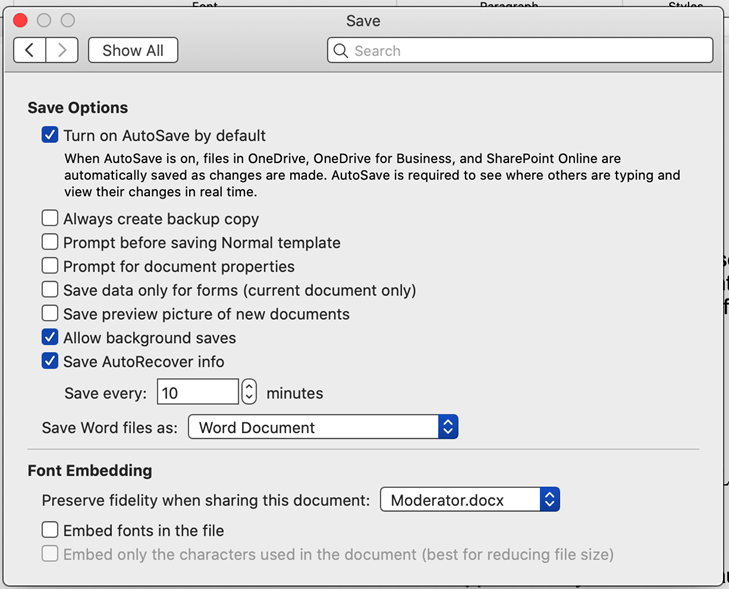
If you’re not sure if auto-fetch is enabled, go to Word> Preferences and click Save on the Output and Sharing tab. Then make sure that the Enable automatic saving by default check box is selected.
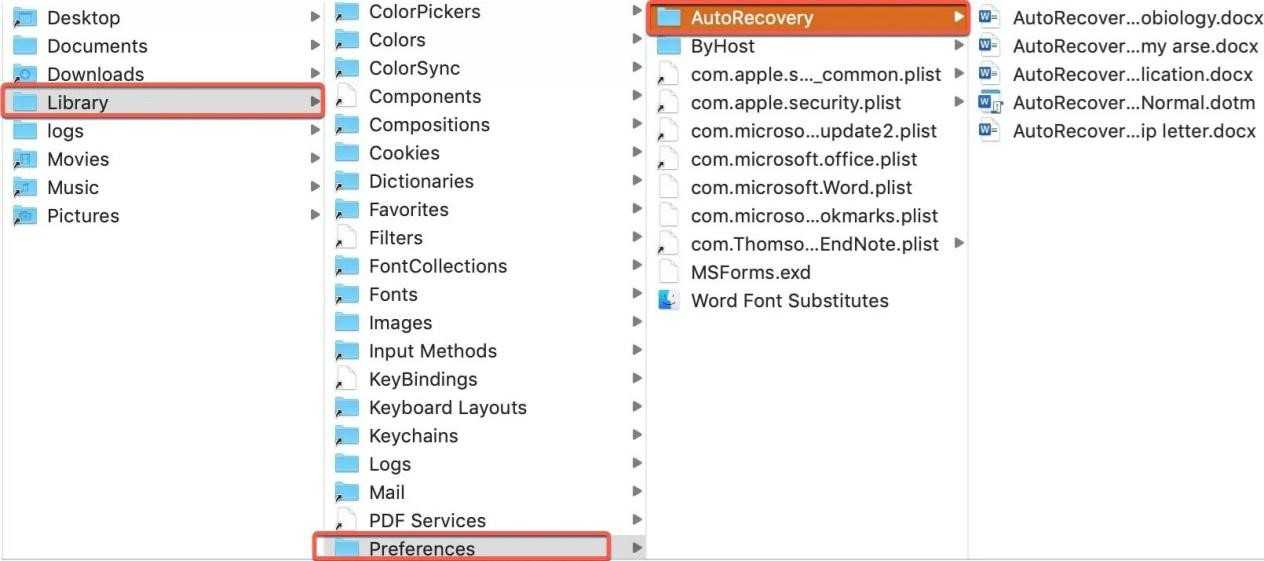
Where are the automatic recovery files located in Word for Mac?
Method 1: Find AutoRecover Files by Searching in Finder
Method 2: Locate the AutoRecover files via the folder path.
- Su Microsoft Office 2019/2016/Office 365 nel 2020/2021: ~ / Library / Containers / Microsoft com / Data / Library / Preferences / AutoRetrieve
- Su Microsoft Office 2011: ~/Libreria/Application Support/Microsoft/Office/Office 2011 AutoRecovery
- Su Microsoft Office 2008: / Documents / Microsoft User Data / Office 2008 Auto Recovery
Note that some missing files may be hidden. You can open Finder and press Command + Shift + Period to show hidden files on Mac and then recover them.
Recover Unsaved Word Document Mac 2021/2020/2019/2016/2011/2008:
To eliminate the possibility of losing our work in the future, you can change the save frequency to a shorter interval using the steps mentioned below.
Steps to change how often AutoRecovery files are saved in Word
For the latest versions:
Per Office 2011:
If you have turned off automatic recovery or if the lost file is the result of clicking the Do Not Save button when you closed the application, the recovery of unsaved Word documents from the automatic recovery folder may not work. However, you can try the method below, which shows how to recover unsaved Word document on Mac without Automatic Repair.
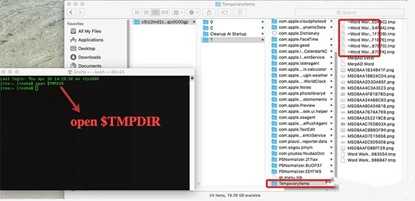
Recovering a lost Word document on Mac from Mac’s temporary folder
MacOS stores temporary files to enhance the experience of those who use applications such as Word. Typically, temporary files are deleted after the program ends. However, it may not be able to do this when an application is suddenly closed. It is therefore possible that the lost Word document will be found.
How to recover unsaved Word document on Mac with Mac Terminal
Were you able to recover an unsaved Word document on Mac? If you still haven’t been able to recover an unsaved Word document, don’t give up and move on to the next solution described below.
Recover a Word document that was not saved on Mac from Recovered Items
Sometimes, the Mac moves temporary files to the Trash upon reboot. Therefore, it is You can recover an unsaved Word document from the Recovered Items folder in the Recycle Bin.
How to recover unsaved Word document on Mac from Recovered Items
We hope you have recovered unsaved Word document on Mac using these simple tips. If it still doesn’t work, you can recover word documents con Time Machine or try to restore the previous version of the lost files, as we will see later.
How to recover deleted Word document on Mac?
If you have deleted Word document on Mac, here are three ways to recover deleted files on Mac.
Option 1: Recover deleted Word documents from recycle bin
If the Word document is moved to the Trash, it can be recovered within 30 days. Here’s how to recover a deleted Word document from the Recycle Bin:
If the document was emptied from the Recycle Bin or permanently deleted with the Delete Immediately command or the keyboard shortcut Option + Command + Delete, you can restore the file from a backup that probably already exists.
Option 2: Recover lost Word files on Mac with Time Machine
Here’s how to recover deleted or lost Word documents on Mac via Time Machine backup files:
If you don’t have a Time Machine backup or any other backup, you can rely on iBoysoft Data Recovery for Mac to restore deleted Word documents.

Option 3: Recover deleted Word documents with iBoysoft Data Recovery for Mac
IBoysoft Data Recovery software for Mac is capable of recover lost Word documents or accidentally deleted files that users cannot otherwise recover from all versions of Office, including Office 2019/2018/2011 and Office 365 in 2021/2020. Search every corner of the Mac, including the hidden temporary folder.
This Word document recovery software employs an advanced scanning algorithm to recover permanently deleted files that are still present on the hard drive but invisible to human eyes. To increase the chances of recovering deleted Word files, it is recommended that you stop saving any files on your Mac as soon as possible. So, start the recovery right away with these steps.
How to recover a deleted Word document with iBoysoft Data Recovery software:
That’s all from the hardware section, keep following us!